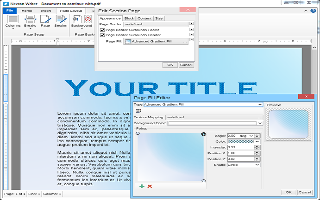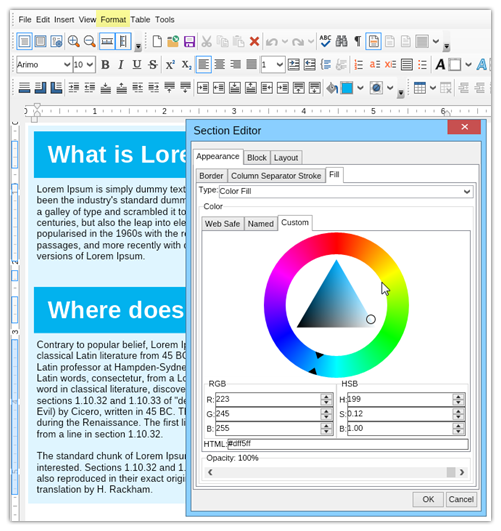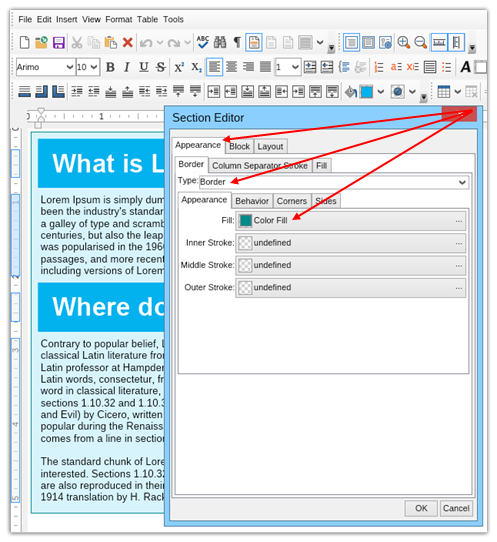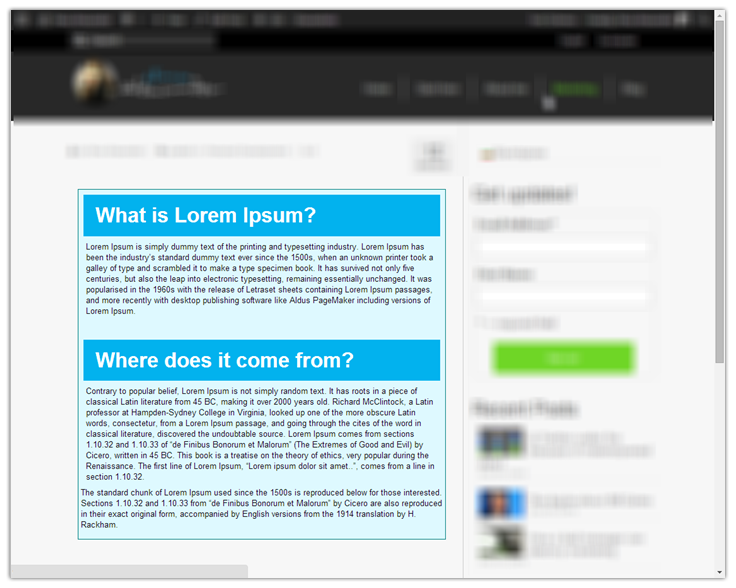
Formatted text for WordPressIf you have a blog on WordPress.com you have already noticed, that text editing functionality is very limitted. This however doesn't only apply to WordPress.com, but also to self hosted WordPress sites. To add aditional text editing options you may need to install a plugin, which some people avoid doing for one reason or another. In this post we will show you how you can enter perfectly formatted text without installing any plugins and with no coding skills required. Follow the steps described below and start adjusting your text to the way you need it to be! 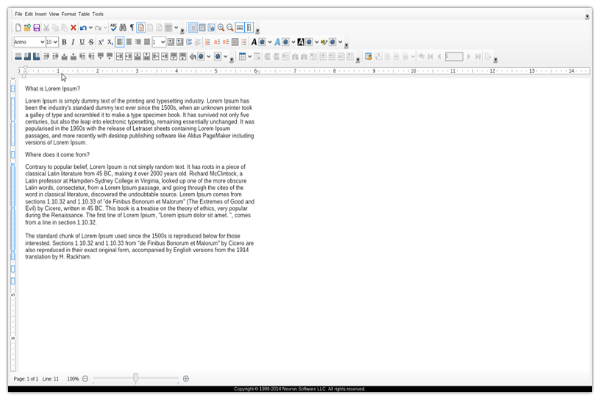 Get startedThe first thing you need to do is enter your text in Nevron Writer. Open Nevron Writer and enter your text as shown in the image. You can change the font settings such as font type and overall font size just as you would in any other text editor. 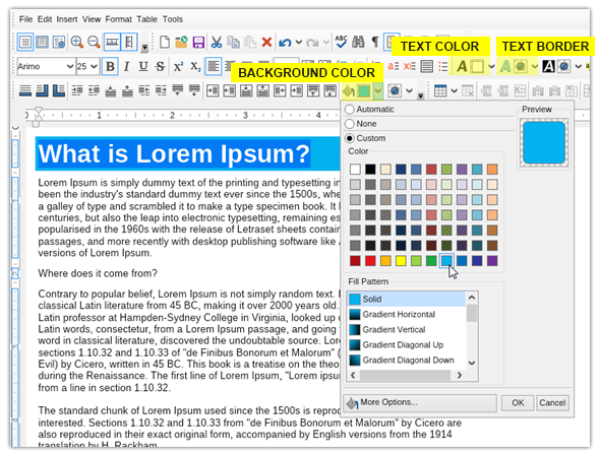 Formatting the Title ParagraphStart by formatting your title paragraph. In this case we will specify a title with a solid colored background. Select the color of the text and the border of the letters (if you would like to have a border color). Then specify the background color. Be careful to select the "Block Background Fill" option (bucket icon) and not the "Background Fill" with the "A" in the icon. The second one serves as a highlighter, while the first one colors the entire line of text until the end of the page, regardless of how long the actual text is. 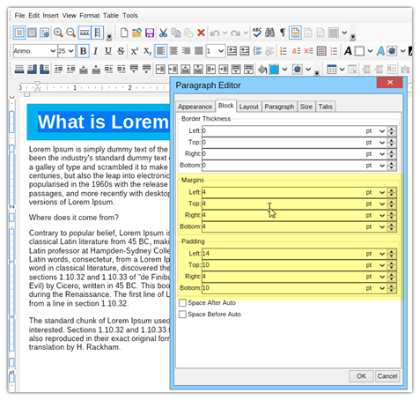 Adjust the space around the titleAs soon as you apply some background color to your text, you'll notice that it looks pretty much as in any other text editing software. This is however one of the areas in which Nevron Writer excels. Navigate to the menu Format --> Paragraph to reveal the editor you see on the image and under the "Block" tab, specify the margin* and padding** of the text. * margin - the distance between the end of the color area and the end of the page ** padding - the distance between the end of the text and the end of the color area  Apply background to the entire textOnce you have adjusted the titles, you can move onto applying background color on the entire section of text. To do that, navigate to the Format --> Edit Section menu and go to the "Fill" tab, under "Appearance". You can select your color from the color wheel as you see, use a web safe color, enter the hex value of the color you need. You can also specify the transparency of the background. You have an incredible amount of options for the background fill, including an image, gradients, advanced gradients, hatch and more. 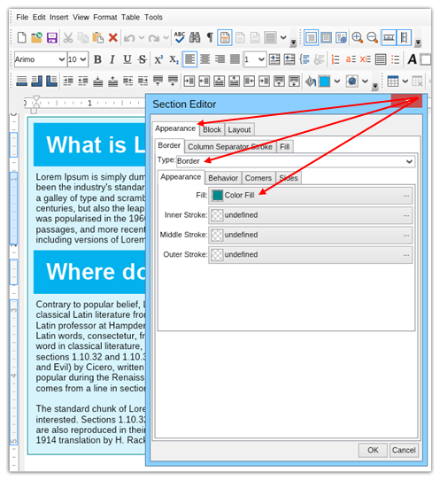 Add border to the background colorThe first tab in the Section Editor menu allows you to add border to the section of text you have applied background fill to (but you can still apply a border even if there's no background color).
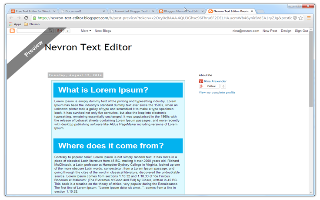
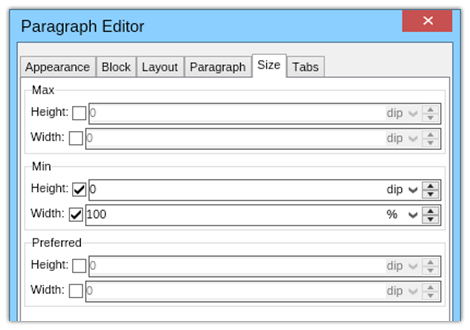
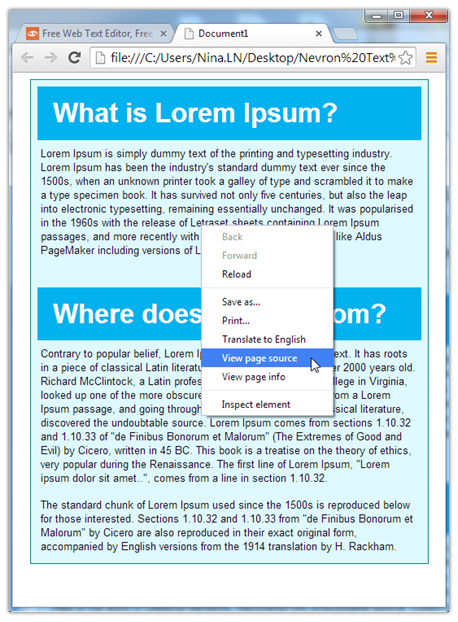
Bare in mind that this doesn't apply a border to the paragraph, so when you press enter you won't be transfered to a new paragraph without any formatting. When the section editor is selected, it applies the formatting to the group of paragraphs (!) you are currently working on. TIP: If you would like to continue typing but be out of the section you have been editing until now you need to place the cursor at the end of the text, then go to Insert --> Inser Break and select "Section Continuous". 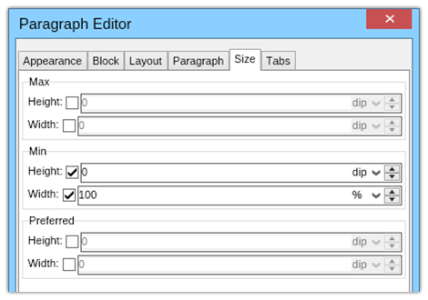 ! IMPORTANTWhen you will be exporting text as HTML, you sure want to make it responsive. To achieve this, open the Paragraph Editor, go to the Size tab and set the Min Width to 100%. If you skip this step, your text will be formatted in a box with a specific size and will not be responsive once you save it as HTML. 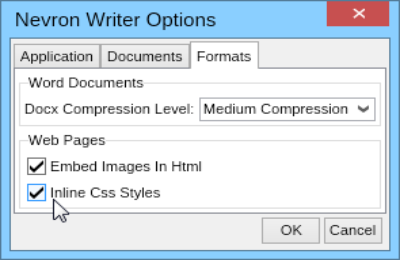 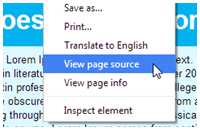 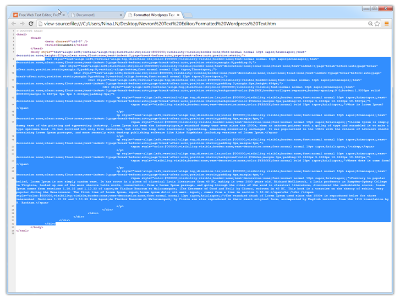 Save and extract the HTML you needOnce you are ready with the formatting you desire to have you can go ahead and save the document. Nevron Writer provides you with two options: (1) to save it as HTML (where the CSS code that applies all formatting is separate from the paragraphs of text) or (2) as HTML with inline style. If you do not have access to the CSS file of your WordPress you should choose the second option. If you've decided to go with option #2, navigate to the File menu and then Options. Under the Formats tab, you'll see a section named "Web Pages". Select the option "Inline Css Styles" and click the Ok button to save this setting. Before saving a web page with the inline CSS you'll need to restart Nevron Writer, so make sure you've saved all the changes on your documents. After you have saved your file you should open it (it will load your default browser). You will see your eddited text spread across the screen. If you resize the browser window you will notice the text adjusting inside (this is why we explained how to set the width to 100%). Right click inside the browser window and select View page source. A new window with lines of text will pop open. You need to select and copy all the text between the opening and closing body tags. 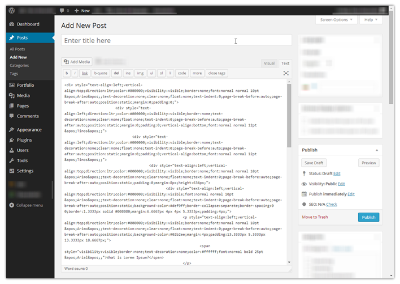 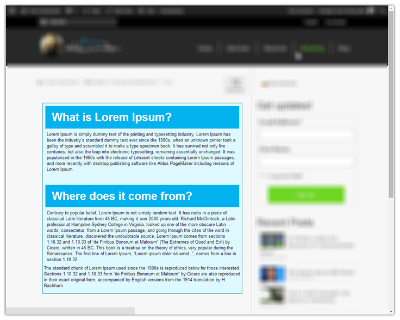 Entering your text in WordPressTo enter your text into WordPress, create a new page or post (or open an existing one). Inside your WordPress content entering section, select the Text tab which you can see on the first image here. Paste directly the text that you have copied after selecting View page source previously. You can then switch tabs and you will see the formatted text. You can additionally tweak and modify the text as you wish with all of WordPress regular editing features. If you have some HTML and CSS knowledge you can further format the text from the Text so it fits your preferences. If your WordPress theme is reponsive, so will be your text. You can use the exact same approach for any website which allows you to enter raw HTML. Systems such as Wix.com, IMCreator.com or Squarespace.com also support HTML entering, so you can enahnce pretty much any type of website you may have. |
We use cookies to allow us to automate the access and the data entry functions of our website and to correlate online ordering information for purchases you may make while at the website (if any), tailor our website to your preferences or interests, or customize promotions or marketing. For full details read our cookie policy.